Thursday, September 19, 2013

AD Computer scanner with PowerShell for Windows 2003 and up with Gridview

As always; my days get all clogged with things i must do; for instance make an overview of all AD computer objects and sort out all obsolete items.

This can be done in many ways i just opted for the PowerShell way and using the Gridview. this thing is so powerfull out-of-the-box that the script itself remains small.

the output looks like this:

ADComputerScanner1

This grid will find: Name, Description, OperatingSystem, Servicepack,Lastlogontimestamp, Creation date, Logoncount and the time a bad password was put in.

The Gridview itself has some powerful filtering options. With the add criteria; filters items can be added. you just have to experiment with the filters to see what they can do.

This script does NOT use the ActiveDirectory PowerShell module. it just finds the AD domain root itself and connects to it with ADSI so this script can be run just about everywhere as long as it is a Windows Domain with PowerShell enabled on the scanning machine, this script, for example, is ideal to scan a Active Directory that is not Domain level 2008 or higher; it also runs good on older 2003 environments.

Please beware; in large environments this script can pull quite some LDAP traffic from a domain controller; it is not BITS enabled and does not use Qos

have fun with it

#####################################################
# Name: ADComputers Scanner
# Date: 19-9-2013
# Version: 1.0
# Creator: Bas Huygen
# Changetones:
#####################################################

#get ADSI information from root domain
$dc=[ADSI]""
$domain=$dc.distinguishedName
$domainexw="LDAP://"+$domain
$ADDomain=[ADSI]$domainexw
$ADSearch= New-Object System.DirectoryServices.DirectorySearcher
$ADSearch.SearchRoot=$ADDomain
$ADSearch.Filter= "(objectCategory=computer)"
$ADSearch.PropertiesToLoad.AddRange() 2>&1

#get all computers from the root domain
$results=$ADSearch.FindAll()

$array.Clear()

#Loop through all computers of the domain and gather information
foreach($res in $results){
$obj = New-Object PSObject

#$resdescr=$res.Properties.description
$obj | Add-Member NoteProperty Name ([string]$res.properties.name)
$obj | Add-Member NoteProperty Description ([string]$res.Properties.description)
$obj | Add-Member NoteProperty operatingsystem ([string]$res.Properties.operatingsystem)
$obj | Add-Member NoteProperty operatingsystemservicepack ([string]$res.Properties.operatingsystemservicepack)
$rawtime= [string]$res.Properties.lastlogontimestamp
$obj | Add-Member NoteProperty lastlogontimestamp([datetime]::FromFileTime($rawtime))
$obj | Add-Member NoteProperty Created ([string]$res.properties.whencreated)
#$pwlastraw=[string]$res.properties.pwdLastSet
#$obj | Add-Member NoteProperty PasswordLastSet ([datetime]::FromFileTime($pwlastraw))
$obj | Add-Member NoteProperty LogonCount ([string]$res.properties.logoncount)
$badpwdraw=[string]$res.properties.badpasswordtime
$obj | Add-Member NoteProperty badPasswordTime ([datetime]::FromFileTime($badpwdraw))


#Write-Output $obj
[array]$array += $obj
}


$Title = "Machine view of domain $domain"
$array| sort Name|Out-GridView -Title $Title


Friday, September 13, 2013

WakeUp! a small GUI to wake Windows Machines from a PowerShell script

Because i need it so much i took the script i published before on link and enhanced it with a little GUI. here is a screenshot:

wakeup

It works like the script; the input is the MAC address from the line after MAC Address above and the script converts the MAC address to a unicast Wake on LAN packet. Next it will sent it through all connected Network adaptors connected.

On the Settings tab there are two lines: the DNS domain and the DHCP export file; used for retrieval of the cached MAC addresses.

It works like this: just type the machine name on the Computer Name line and hit Wake Machine the script will try to fetch the MAC address from the DHCP export. another way to use this app is to input the MAC address (with or without computer name) and hit Wake Machine this will also work.

wakeup2

Information about the DHCP Export can be found here (again) .

The two lines on the settings tab are reset to default every time the scripts starts. to change these lines to your own default, edit lines:  289 and 320 from the script.

wakeup3wakeup4

the script can be downloaded here: http://sdrv.ms/ZyH49Q

please beware, it is not signed, smart screen will warn you about that.

‘Good morning to you machines”

Wednesday, September 11, 2013

How to Setup SQL Server for Config Manager 2012 SP1 (SCCM)

Because i have had quite some trouble setting up a SQL Server for Config Manager 2012 on a separate server i decided i should write this down and share it to other people having similar problems:

So for Config Manager 2012 the requirements for a database are the following (excerpt from http://technet.microsoft.com/en-us/library/jj628198.aspx)

System Center 2012 SP1 component SQL Server 2008 R2 SP1 Standard, Datacenter SQL Server 2008 R2 SP2 Standard, Datacenter SQL Server 2012 Enterprise, Standard (64-bit) SQL Server 2012 SP1 Enterprise, Standard (64-bit)

App Controller Server

Data Protection Manager (DPM) Database Server

Operations Manager Data Warehouse

Operations Manager Operational Database

Operations Manager Reporting Server

Orchestrator Management Server

Service Manager Database or Data Warehouse Database

Virtual Machine Manager (VMM) Database Server


SQL server installation

To install an SQL server just follow the standard installation for a server and DO NOT SELECT EXPRESS version; SCCM Central site does not support EXPRESS versions of SQL server.

During installation of SQL the only thing to remember is: select a domain account for the SQL Server service:

sqlserver3

I am a typical IT admin so i am lazy when it comes to configuration in a test lab, so i used the domain administrator account for this test version; please do not do this in a production environment; be a good boy/girl and create a service account for this!

After the installation of SQL server has finished you have to configure the server for  three things:

  • Firewall
  • SQL configuration
  • Local administrators of the SQL server

The first one is quite simple: fire up the Firewall application and add a port rule for TCP 1433 and TCP 4022 to allow minimally the Domain profile.

sqlserver4

SQL installation itself does also add the SQLServer x64 to the firewall, this can stay because it does not do any harm.

Next the SQL configuration: this one did cost me most of my time because i did not notice the message:

The instance name that you use for the site database must be configured with a static TCP port. Dynamic ports are not supported

sqlserver1

This is really important: so i repeat : DO NOT USE DYNAMIC TCP PORTS ON SQL SERVER FOR THE SITE DATABASE OF SCCM 2012

The configuration of the sql service look like this:

sqlserver2sqlserver5sqlserver6

remember: the TCP Dynamic ports must be blank on all IP’s you use. also the TCP ports all must have 1433 when you use this (default) SQL server port for SQL transactions.

The last configuration is the addition of the SCCM server computer account to the local administrators group of the SQL server because i you don’t you receive an error like this in the prerequisites check of SCCM 2012 SP1

sqlserver7

to enable this do the following:

Open the local user and groups MMC on the SQL server and open the group administrators: add the COMPUTER account of the SQL server to this group, like this:

sqlserver8

after this, the prerequisites check should be fine and the SQL portion of the installation is complete.

See you next time!

Monday, September 09, 2013

Handy Computer scanner

When you do individual computer migrations it is desirable to get some computer- software- logged on user- and patch information on beforehand about the to-be-migrated computer.
For this i have bundled a few scripts i created and used before and wrapped them into one GUI to scan a machine and get the information presented in a GUI.
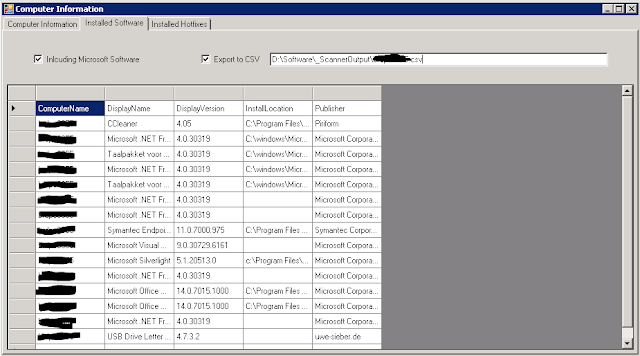
Here are some screenshots:
computerscannertab1


computerscannertab3
The scanner works real easy: just input the computer name and hit Get Computer Information. or just hit <Enter>

This version exports a csv to a path specified behind the Export to CSV checkbox. by default the checkbox is checked.
to change this behaviour goto line 1143 and edit the line to:
$cbExport.Checked = $False

To change the location to which the CSV file is written, edit the line: 1137
$tbCSVExport.Text = "D:\Software\_ScannerOutput\%Computername%.csv"

For the scanner to work the target computer must be WMI- and remote registry enabled. Links: http://kb.gfi.com/articles/Skynet_Article/how-to-enable-remote-registry-through-group-policy
http://kb.gfi.com/articles/Skynet_Article/how-to-enable-remote-registry-through-group-policy

The script can be downloaded here: http://sdrv.ms/166HegJ

Friday, September 06, 2013

PowerShell Array’s inside-out

 
Learning PowerShell is one thing, but learning arrays in PowerShell is another. Since i started using PowerShell as my primary programming- and scripting language i have stumbled on this array stone many times.

Now it is time to really get to the bottom of this.

What’s an array

Arrays are, bluntly put, programming variables with more functionality and more space in this view an array can be used as a variable in your PowerShell code. as a matter of fact most beginners do experience arrays as a variable certainly in the beginning. that is because arrays do tend to work exactly like  a variable when it only has one item and one value. look at this example:
[string]$Variable="one value"
[array]$array= @("one value")

$Variable
"---------"
$array

This code will display exactly the same return codes when run.

one value
---------
one value

now look at this:
[string]$Variable="one value","one value","one value"
[array]$array= @("one value","one value","one value")

$Variable
"---------"
$array
this will output:
one value one value one value
---------
one value
one value
one value

Here you will see the first differences between a variable and an array. The variable will handle the value as one string while the array will display 3 strings in an row.

PowerShell will use default values for options you do not present. In this case PowerShell will present the entire $variable as a string because you defined the variable as a string so the output will also be a string. with the array we defined a one dimensional array. because of that the output of the array to the default output (screen) will the the presentation of 3 objects, each presented on its own row. you can see the differences even more when you request PowerShell to return a specific item of a variable or array:
[string]$Variable="one value","one value","one value"
[array]$array= @("one value","one value","one value")


PS C:\Windows\system32> $Variable[0]
o

PS C:\Windows\system32> $array[0]
one value

As can be seen from this example the first item of the variable is the first character of the string while the first item of the array is the first object.

Array dimensions


Arrays come in two flavours: one-dimensional and multi-dimensional. the one-dimensional is shown above so lets look at multi-dimensional arrays:

a multi-dimensional array is defined like this:
$MultiArray = @(("one","two"),
             ("three","four","six"))


To retrieve the entire array a simple $MultiArray will suffice but retrieving a specific item from an array like this is done a bit different.

Say you would like to retrieve the second item from the second row, how do you do that?
$MultiArray[1][1]
four

So the trick is to define the item you want to retrieve and define it in square brackets [ ] one for the row to select (the number in the first bracket) and one number for the column (the number in the second bracket) the count of rows and columns is from 0, so row 1 is [0]

Handy tricks in multi-dimensional arrays


There are some nice ‘tricks’ with multi-dimensional arras:


  • retrieve the last item of a row:
$MultiArray = @(("one","two"),
             ("three","four","six"))

$MultiArray[1][-1]
six

So you give a –1 for the last item to be retrieved. so how to retrieve the second last item of row 1?
$MultiArray = @(("one","two"),
             ("three","four","six"))

$MultiArray[0][-1-1]
one


  • retrieve items 2 to 4 from row 2 from an array
$MultiArray = @(("one","two"),
             ("three","four","six","seven","eight","nine"))

$MultiArray[1][2..4]
six
seven
eight

To really get this down have some fun with it like building a loop to get things done:
$MultiArray = @(("one","two"),
             ("three","four","six","seven","eight","nine"),
             ("ten","eleven")
)

$noRows=$MultiArray.Count

for($i=0;$i - $noRows;$i++){$rownow=$null
    [string]$rownow += $MultiArray[$i]
    [array]$gridarray += $rownow}
$gridarray

one two
three four six seven eight nine
ten eleven

That is about it, you should really have a go and do some things with arrays to get to know them well.

See you next time.

Tags van Technorati: ,,