Monday, May 19, 2014

Monitoring OS deployments in SCCM

Since the introduction of the Monitoring function of MDT back with MDT 2012 i have searched for a comparable function in SCCM.


i found the following blogs: http://www.mockbox.net/configmgr-sccm/348-sccm-os-deployment-how-to-monitor-the-task-sequence
and http://www.ronnipedersen.com/2012/03/monitoring-configmgr-2012-os-deployment-using-state-messages/


After reading more of these kind of blogs i desided to install a monitoring instance in the deployment workbench as suggested by: http://blogs.technet.com/b/configmgrdogs/archive/2013/01/25/mdt-monitoring-another-reason-to-implement-mdt-2012-update-1-into-your-configmgr-2012-sp1-environment.aspx


Cumbersome

After i got all communication running and the MDT monitoring functioning i found out it did not really work as expected. most of the time the Monitor would, once of twice during the deployment, update its status but it would not exit it.


The easy solution

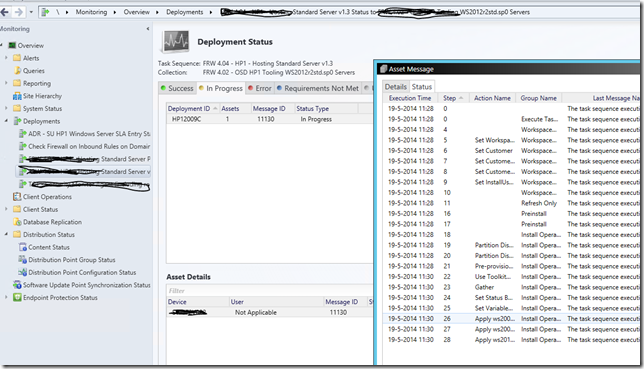
While browsing through the SCCM 2012 R2 console i found out SCCM has all the MDT alike monitoring stached away under: Monitoring - Overview- Deployments -the name of the deployment of the OS deployment
Just browse to the in progress tab (when the deployment is running), access the Asset Details and double click the asset, in the new Asset Message window. The second tab called Status will inform you the exact step of the task sequence.
sccm osd monitoring

Wednesday, April 02, 2014

There are no task sequences available to this computer (SCCM)

Case: you are refreshing a Operating System on a SCCM (2012) device, you start the machine in WinPE (PXE) reapply the Operating System and reinstall the machine.

During the deployment something goes wrong and the task sequence fails: you decide to reinstall the machine and boot it again in WinPE.

During the startup of WinPE (at the moment WinPE tries to get the available task sequences for this device) you get the message: "There are no task sequences available to this computer"

How come?

Explanation:

What happened that you are unaware of is that Config Manager created a NEW SMS ID using the GUID of your computer and placed it in the default "All Systems" collection that probably does not have any task sequence deployed to it. that's the reason there are no task sequences available for it.

Solution:

The best solution will be to use the newly created computer device of SCCM and place it in a collection that has a task sequence deployed to it. DO NOT TRY to delete the new SCCM device because you the old one, the one on the right place, has got the right deployment on it because SCCM recreated a new device ON PURPOSE. the meaning is that the old device got obsolete (property obsolete 'true') so a new fresh device was needed.
I have tried to delete the new device and get this property of the old device to false but that's a faulty and hard way because SCCM does other things to obsolete device too. by the way; there is no standardized way to change there properties. even if you're using PowerShell these properties are well hidden again on purpose.

Monday, March 31, 2014

10000 views!

Yesterday i have had my 10000th view of this blog, i want to thank all the readers for their support!

Wednesday, March 26, 2014

Use Orchestrator to automate SCCM

Recently I have been doing lots of things with MS System Center Orchestrator. this is the automation feature of the system center suite and it is cool!.

Once you know how to use Orchestrator (and that's not very hard, look at all the video blogs on cloud nine for instance) this tool is a real accelerator.

Orchestrator has a long history in the IT, started in the middle of the nineties in France as Opalis, Orchstrator has a big base of users and followers. look at the Codeplex community for instance: https://scorch.codeplex.com/

Here you can find lots of integration packs for Orchestrator. I have used the IP for SCCM 2012, this IP has lots of extra features apart from the standard IP published by Microsoft. check them out!

Automating SCCM actions has never been easier.

Friday, January 24, 2014

Use SCCM Collection variables to target Client computer objects

When you decide to use SCCM 2012 as a configuration manager for multiple tenants (comprising of multiple clients) SCCM does not have means to select computer object of a specific client on its name and subsequently its environment, SLA etc. to enable this mechanism SCCM must have a means of identification to make a query.
In order to get these identification items into SCCM available for selection based on a (SQL) query, collection variables can be used to identify a machine as part of client xyz. the mechanism to enable this is drawn in the following figure:
image
It works as follows:
  1. Define collection variables on the collection in SCCM which holds all object you want this variables to hold (this link shows how)
  2. Modify the MOF files used for hardware discovery (see link)
  3. Create a package that holds a script that reads the collection variables and sets them in the registry of the client (an example is shown here, we use the registry key Workspace as means of selection of these kind of variables) . Deploy the package to the collection mentioned in step 1  
    #############################
    #
    #  ToolingVariables.ps1
    #  Script designed by Bas Huygen
    #  jan 2014
    #  version 0.3
    #############################

    If(Test-Path -path HKLM:\Software\Workspace){
    $tsenv = New-Object -COMObject Microsoft.SMS.TSEnvironment
    #set definitions
    $Customer = $tsenv.Value("Customer")
    $CustomerEnvironment=$tsenv.Value("CustomerEnvironment")
    $Customercode=$tsenv.Value("Customercode")
    $SLA=$tsenv.Value("SLA")
    $WorkspaceName=$tsenv.Value("WorkspaceName")
    $WorkspaceVersion=$tsenv.Value("WorkspaceVersion")
    $ToolingVar1=$tsenv.Value("ToolingVar1")
    $ToolingVar2=$tsenv.Value("ToolingVar2")
    $ToolingVar3=$tsenv.Value("ToolingVar3")

    #set registry items
    set-itemproperty -path HKLM:\Software\Workspace -name Customer -value $Customer
    set-itemproperty -path HKLM:\Software\Workspace -name CustomerEnvironment -Value $CustomerEnvironment
    set-itemproperty -path HKLM:\Software\Workspace -name Customercode -Value $Customercode
    set-itemproperty -path HKLM:\Software\Workspace -name SLA -Value $SLA
    set-itemproperty -path HKLM:\Software\Workspace -name WorkspaceName -Value $WorkspaceName
    set-itemproperty -path HKLM:\Software\Workspace -name WorkspaceVersion -Value $WorkspaceVersion
    set-itemproperty -path HKLM:\Software\Workspace -name ToolingVar1 -Value $ToolingVar1
    set-itemproperty -path HKLM:\Software\Workspace -name ToolingVar2 -Value $ToolingVar2
    set-itemproperty -path HKLM:\Software\Workspace -name ToolingVar3 -Value $ToolingVar3
    }

    Else{Write-Warning "This system is already equipped with customer variables; Installation aborted"}
  4. Create a Task Sequence that reads the collection variables and registers them in the local registry with the aid of the script of step 3
  5. Read the collection variables like this
    Use the script like this
  6. Deploy this task sequence to the collection of the machines you want to configure with collection variables
  7. The variables are set in the registry of the client by running the script from step 3 
  8. The next hardware scan the relevant portion of the registry is scanned and the results are added to the hardware properties of the client in the SCCM database
image
As soon as the registry has the settings and the MOF file is modified to scan the relevant portion of the registry, these settings are available in SCCM for querying. now you can create collections based on these settings and build reports with it as well.
image
Example of query criterion in SCCM 2012 R2

Friday, January 10, 2014

Funny IT codes

Today I'll share a short, simple and humorous blog entry: did you ever notice that the IT has some names-, error- and informational code that looks a lot like military stuff?

Here is a list of military sounding IT code I could find:
  • Spyware
  • Private cloud
  • Major incident
  • Kernel Panic
  • General Failure
  • Agent ..

Wednesday, December 18, 2013

Cannot connect to Core Hyper-V Server 2012 R2 with RDP

So i was thinking to add a new Core Hyper-V Server 2012 R2 to my network at home based on a workgroup and configure it with RDP after enabling the Remote Management and Remote Desktop from the console. That’s a no go by default… What do i mean? it turns out Core Hyper-V Server 2012, and Core Hyper-V Server 2012 R2 have their firewalls on by default and configured to drop everything from the public profile (all rules are disabled)
The Startup menu of the server does not change these profiles to allow RDP traffic in (it only allows the Domain and Private profiles to allow the RDP traffic)
So how do you enable these rules?
  1. Configure the Firewall locally from Command line
  2. Use CoreConfig tool for Server core 2012
The First one requires you to log on locally to the Core Hyper-V Server 2012 and use the PowerShell to enable these Firewall rules.
it is done this way:
Set-NetFirewallRule -DisplayGroup “Windows Firewall Remote Management” -Profile Public -Enabled True

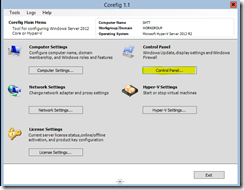
The configuration with CoreConfig is done with a GUI. just download the source and copy it to a local folder on the Core Hyper-V Server 2012. start PowerShell from the command shell by typing: PowerShell after the Prompt. browse to the folder in which you copied the CoreCofig files and .\CoreConfig.ps1.

Now simply browse to the Control panel:

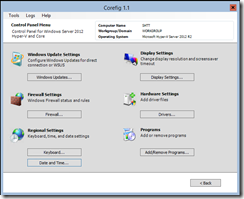
1

Click on the firewall settings

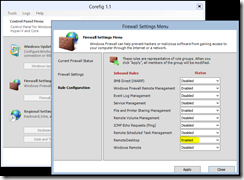
2

And enable the Remote Desktop rule (the active Firewall profile (Public) is selected by default)

3

That’s it, see you next time.