Wednesday, December 18, 2013

Cannot connect to Core Hyper-V Server 2012 R2 with RDP

So i was thinking to add a new Core Hyper-V Server 2012 R2 to my network at home based on a workgroup and configure it with RDP after enabling the Remote Management and Remote Desktop from the console. That’s a no go by default… What do i mean? it turns out Core Hyper-V Server 2012, and Core Hyper-V Server 2012 R2 have their firewalls on by default and configured to drop everything from the public profile (all rules are disabled)
The Startup menu of the server does not change these profiles to allow RDP traffic in (it only allows the Domain and Private profiles to allow the RDP traffic)
So how do you enable these rules?
  1. Configure the Firewall locally from Command line
  2. Use CoreConfig tool for Server core 2012
The First one requires you to log on locally to the Core Hyper-V Server 2012 and use the PowerShell to enable these Firewall rules.
it is done this way:
Set-NetFirewallRule -DisplayGroup “Windows Firewall Remote Management” -Profile Public -Enabled True

The configuration with CoreConfig is done with a GUI. just download the source and copy it to a local folder on the Core Hyper-V Server 2012. start PowerShell from the command shell by typing: PowerShell after the Prompt. browse to the folder in which you copied the CoreCofig files and .\CoreConfig.ps1.

Now simply browse to the Control panel:

1

Click on the firewall settings

2

And enable the Remote Desktop rule (the active Firewall profile (Public) is selected by default)

3

That’s it, see you next time.

Monday, December 02, 2013

Using Nagios++ Agent for Monitoring Windows Systems (Part 3, managing the client)

In the former post the Nagios++ client’s architecture was shown as well as its installation concepts. In this post i will elaborate some more on the installation of the Nagios++ agent and from there on explain the way the Agent will be managed from installation perspective

To summarize the Nagios++ Agent configuration three components make up a monitoring node:

  1. .ini file(s)
  2. Nagios Management engine
  3. Supporting classes and modules

The management engine is installed with a Microsoft installer file (.MSI) the way installations like this are done is very straight forward. the only prerequisite for an .MSI installation to work  is the availability of Microsoft Installer framework. the actual command line for the installation is as follows:
msiexec /i "NSCP-0.4.2.58-x64.msi" INSTALLLOCATION="C:\Program Files\NSCP" /qn /l* %TEMP%\install_nagios_agent.log

When the engine is installed the supporting .ini file(s) and classes must be installed. this is a very straight forward process of copying files from one central location to the managed node.

The Modules and scripts directory are the places in which all additional modules and scripts respectively have to be placed.

The ini file is the main configuration of the Nagios Agent. The configuration of it is very well covered in many posts, look at them if you will here, here

In short the list of allowed hosts will configure the partners to which the Nagios agent will talk. modules defines the modules which are allowed to do checks on the monitored node, Aliases are checks being done by the Nagios agent with the aid of the allowed modules.

The main challenge


So when all agents are in place on the monitored nodes the main challenge is the maintenance of the set of scripts, plugins and off course the ini file(s) themselves on the nodes. let me clarify this a bit more:

Because of the nature of monitoring (collecting lots of counters from hosts) the monitoring aspect of a large number of hosts can become problematic. Counters will have to be bundled to sets of counters which themselves do represent a function or service of that device. Furthermore with monitoring large clients with, so called, chains. a group of monitored nodes must be configured in such a way the individual node status reflects its place, function and weight in the chain.

In short: the .ini file on a monitored node will reflect its place in the monitoring process of that client. By now i think you can imagine the generation of specific .ini files for specific groups of nodes will require a system that can manage and maintain all these aspects of the generated .ini files.


What .ini files will have to be generated


For monitoring of chains and clusters, specific checks will have to be done on the target nodes. for instance: in a SQL cluster of 3 nodes; certain checks targeted at cluster services and SQL processes will have to be added to the .ini file that will be copied to the cluster nodes. Likewise .ini files will have to be generated for Mail servers etc.

How should this management system manage the configuration of all these .ini files?


The system should be able to do configuration management in all its aspects concerning .ini files and supporting modules, classes and scripts.

  1. A central Template .ini file should be maintained by the system, in this case it means the system must always have a reference .ini file and leave it untouched
  2. All available modules must be catalogued, for each modules its use to what systems or functions must be known
  3. All available classes must be catalogued, for each class its use to what systems or functions must be known
  4. All available scripts must be catalogued, for each script its use to what systems or functions must be known
  5. for each module, class and script its use must be inventoried
  6. All monitored nodes must be known in this system
  7. For each monitored, node mappings must be available to its used .ini file, modules, classes and scripts
  8. The system should be able to generate a new .ini file with a single action based on the reference ini file and its specific modules, classes and scripts
  9. The system should have an inventory of each node, its deployed ini files, modules, classes and scripts as well as its individual versions.
  10. The system should be multi tenant
  11. The system should be able to host multiple sessions simultaneously
  12. The system must have redundancy and recovery features
  13. The system must have a connector to the used software distribution systems so it can deliver the content directly to the right software distribution collection
  14. The system should have a management interface, which supports Role Based Administration, in which administrators can manage the monitoring configuration of their own clients and/or sites.

When all these items are covered you will be able to manage and maintain the monitoring of multiple clients and sites. In this way delegation of administration is also possible.

Saturday, November 30, 2013

Using Nagios++ Agent for Monitoring Windows Systems (Part 2, Windows Agent and installation of it)

In the former post i explained the way monitoring has been designed nowadays. Coming from there the next step is getting the framework up.
In this series of posts i will not elaborate on the Nagios Server, to get an idea of a installation of the Nagios server please refer to this post.

Design of the Windows Nagios++ Agent

The Nagios Agent for Windows is available on the following link. the designed of the Nagios++ Agent can be seen in the next image:
Nagios engine
The Agent is comprised of the following components:
  • an engine which is capable to do checks on Windows systems
  • Configuration ini-file that defines what the engine checks- and how to execute those checks
  • A collection of classes (modules) which are needed to execute the checks
  • An inbox which it needs to collect tasks from the Nagios Monitoring server
  • An outbox which is needed for the transfer of results to the Nagios monitoring server
The Nagios Server periodically tells the Agent via the Inbox what to check. After the check has been executed the results will be stored in the Outbox until the Nagios Server collects it in its next run.

The actual installation

The Nagios Agent for Windows has two types of sources available for installation: an installer file (.MSI) and a Zip file. both are sufficient to get the agent on a Windows system. the preferred way to install a Windows application is via .MSI because that mechanism has a lot of supporting features for installations on Windows systems the zip file does not have.
To get a Windows node in Nagios fully running the installation of the agent needs 3 components:
  • .ini configuration file
  • Nagios MSI installer
  • Supporting classes and modules
Windows Agent installatie
All three components must be installed on the Windows node on a folder of one of its drives (preferably the default Nagios installation folder C:\Program Files\NSCP)
The way to distribute these components can be done via a software distribution system-, script installation or by hand. the preferred way is by using a software distribution system.

Network requirements

For a Nagios Agent to work two ports must be opened locally. these are ports TCP 5666 (for incoming Server requests to the inbox) and port TCP 5667 (for outgoing communication to the Monitoring server)
That's it for this part. in the next post on this subject i will elaborate on the management of the Nagios Agent for Windows.

Friday, November 29, 2013

Using Nagios++ Agent for Monitoring Windows Systems (Part 1, introduction)

Hello again, in this series of post i will elaborate on the subject of monitoring Windows systems with Nagios++ and subsequent systems based on Nagios

a little introduction into Monitoring Computer systems:

Computer system monitoring is a practice of collecting representative counters for computer systems you want to know the status of.
With monitoring there are two endpoints ‘talking’ to each other: Server and Client. The Server’s primary role is to collect counters of Clients. The Client presents a set of counters to the Server system.

Monitoring globally knows two types of methods to collect these counters, Client push and Server Pull
basic monitoring 1basic monitoring 2

Ways of communication

There are 3 communication methods known to monitoring components:
  1. Real time monitoring
  2. Scheduled monitoring
  3. Triggered monitoring
With a client push system the client system pushes counter data to the Server, this can be a Real time push or a scheduled push of data. the other way around, a server system can poll a client ‘real time’ for certain counters or do timed checks on a client. another way of monitoring is based on creating baselines of a monitored system and subsequently only registering deviations of this baseline.
The main problem with Real time monitoring is the communication of the systems; with this methodology the client must always have access to the server system and it must also have a way to deliver its data to the ‘right destination desk’ on the Server system. with a limited amount of systems this can work without any addition overhead but when the amount of clients systems increases the problem of communication and counter delivery becomes prominent. this way of working can only work very good when the communication is managed by a very strict managing system but even then it becomes unmanageable when too much systems are plugged in.
When you use scheduled communication as means of monitoring the afore mentioned problems become less significant because the initiating component of the monitoring system will fetch the data of a system on fixed times and it already knows the data will be from system xyz and because of this will store the data on the place it holds all data of system xyz.
Using the 3rd method communication method between monitoring components, data transfer is kept to the very minimum, only when a deviation to a known baseline is detected the agent will report this to the server except when it is unable to communicate. in that scenario an action will be triggered on the monitoring server.

Monitoring Agents

The general way to get monitoring like this working is by using agents on client devices. Agents do have one primary function: to execute a task presented by the server component of the Monitoring system.
Monitoring agents do come it two categories: the passive agent, and the active agent.
The main difference between these two is the way the agent collects its counters and presents them to the Server.

Passive Agent

Generally passive agents are used by monitoring systems which are based on scheduled device polling, the way this goes is as follows:
  • The Agents is installed via software distribution or by hand locally
  • During installation or later from a external source the agent gets its configuration pushed
  • in its configuration, roles are defined to whom the agent may talk and what the agent can monitor
  • at a certain point in time the agent receives an external action request
  • the first step is a check weather the agent is allowed to talk to the external source, if not the request will  be dropped
  • when the request is valid the agent will try to execute the request, if it cannot the request is dropped
  • the agent reports its status back to the external source

Active Agent

The active agent differs from the passive agent in the way it is configured- and the way it communicates to the server. agents like this generally tend to use the 3rd communication method, it works like this:
  • Generally the installation of active Agents is begun by a discovery of systems by a monitoring server
  • When discovered the system is matched to specified criteria specified on the server, if they match an agent installation is started
  • After the installation of the agent, it tries to connect to a monitoring server by itself (generally the server that presented the agent)
  • When a server is found the agent requests configuration data, the Server sends configuration data of all available modules to the client
  • the agent downloads the configuration data compares it to the local configuration and requests modules and classes for its found configuration
  • The server sends the configuration and classes to the agent
  • The Agent applies the logic, runs checks and sends this data to the server
  • Apart from heartbeat no more communication between agent and server is started except when a deviation from a monitoring rule has been detected by the agent or in the event of a change in configuration on the client has been detected (like an installation of a new application, service etc.)

‘Alive checking’

Weather a system is alive is done differently between the two systems, using passive agents, servers tend to check alive by doing regular pings. On active agents the agent itself maintains a ‘heartbeat’ to the monitoring server. when the heartbeat stops, after a predefined amount of missed heartbeats an action is triggered.

So how does Nagios fit into this picture?

Nagios is an open source monitoring system, it is based on a passive agent. for an application of Nagios to a Windows based platform a few ‘roadblocks’ will have to be paved. in the next article about this subject i will elaborate on the installation of Nagios agents on Windows based machines.

Wednesday, November 13, 2013

Reinstall SCCM 2012 CAS server

This week i have been busy installing System Center Config Manager 2012 SP1 on a big new delivery site my company is building.

Long story short, installing SCCM 2012 in a new environment is not that difficult BUT when you experience an entire system down during an upgrade of config manager 2012 from SP1 to R2, the recovery of such a Hierarchy is some challenge.
this is the situation: (i use CM12 as a short for System Center Config Manager 2012)

  • CM12 CAS based on SP1 named CasServer installed with CM12 SP1 CU3
  • CM12 Primary site as child of the previous CAS installed with CM12 SP1 CU3
  • The CAS has a separate (physical) SQL server 2012 with a name like SQLServer
  • The Primary has SQL 2012 installed locally as its own Database server named PriServer
sccmsitecas-pri

 
  • The CAS was in the middle of the upgrade of CM12 SP1 to R2
The Entire Cluster went down at that moment the setup was configuring the CAS database. After the recovery of the cluster my CM12 configuration was just hopeless. none of the consoles worked and services were complaining about anything.

I tried the following recovery scenarios:
  • Restore of the CAS DB on SQLServer: SUCCESS
  • Recovery of the CAS with the option: "recover site from manually restored database" : SUCCESS
  • Check of full functionality in CM12 manager: FAIL - Database replication from CAS to PRI failed with error message:
  • Next scenario: Upgrade CAS to CM12 R2: FAIL replication will not start because of inconsistent content in the queue of the Primary site server
  • Next scenario: Uninstall PRI and CAS and reinstall CAS, recover old CAS DB and restart CM12: SUCCES though it has some hooks that i will explain here.
How to recover a CAS while the current CAS DB is in unknown state:
  • Have a good CAS Database backup ready and online to use
  • Uninstall All connected primary sites from the CAS (how you do that is another subject i will try to explore later)
  • Uninstall the CAS and remove the database while uninstalling (that's an option)
  • Open the registry on SQLServer. backup- and delete the RegKey tree: HKLM\SOFTWARE\Microsoft\SMS
  • Install the CAS as a brand new Server with a brand new Database
  • Stop all SMS services on the newly installed CAS
  • Go to the SQL manager and connect to the SQLServer Database engine
  • From the Databases entry right click the newly created DB and select task Detach.
    • check drop connections
  • Now right click on Databases and select task restore Database; use the option Source - Device
  • Select Backup media type: File and click the Add button; browse to the browse with the ... button to the .BAK file of the Database Backup you have saved previously
  • SQL will check the BAK file and, if checks ok, will display its contents. if OK by you hit the OK button and the restore will start
  • After all this went well the CAS server should restart as soon as you open the CM12 management interface.
  • Now do install all Cumulative updates you have applied to the level you did on the previous CM12 configuration (the one before the crash or restore)
At this point your CAS should be fully functional again

My next post will focus on the restore of the Primary sites.

    Wednesday, October 30, 2013

    Introduction to PowerShell book in Dutch, PowerShell voor IT beheerders

    This time i have written a introduction to the PowerShell language in Dutch for my fellow countrymen. It aims for a comprehensive introduction to the general concepts of PowerShell.

    Dit keer heb ik eens in het Nederlands een boek geschreven wat een inleiding geeft in PowerShell. doelgroep is IT beheerders die aan de slag willen met PowerShell en dit graag in het Nerderlands willen leren.

    Link to the Book; Link naar het boek: http://sdrv.ms/1aop7Ea
    Have fun with it and till next time.

    Thursday, October 10, 2013

    Get-ADUser and get their properties like all domain admins

    In an effort to get a list of all domain administrator accounts i did some digging into the Active Directory PowerShell module and found some very interesting applications. For instance the following rule returns all members of the Domain Admins AD group.

    $alldomainadmins=Get-ADGroupMember -Identity "Domain Admins"

    When you have a variable of all AD domain admin objects you can do some interesting filtering. for instance you can get all domain admins with a certain common name:

     $alldomainadmins|where {$_.distinguishedName -like "*internal*"}

    another interesting application of this is the search for disabled accounts and logoncount like this:

    foreach($member in $alldomainadmins){
    $testuser=Get-ADUser -Identity $member
    $logoncount=Get-ADUser -Identity $member -pr logoncount
    $create=Get-ADUser -Identity $member -pr whenCreated
    If($testuser.enabled -ne "true"){ $testuser.Name +" = disabled and has logged on "+$logoncount.logoncount+" times "}
    }
     
    You should have a go and play around with the Get-AD* cmdlets, they are very powerfull!

    Have fun, till next time


    Tuesday, October 08, 2013

    Microsoft Excel compatibility: “. cannot be accessed. The file may be corrupted, located on a server that is not responding, or read-only”

    I got this 'error' (it is an information box) on new Windows 7 clients running Office 2010 (excel) at a client of ours; after some troubleshooting i got the whole the story en wrote it down here.

    Case:

    In the case of this error, the situation is as follows:
    Coming from Windows XP SP3 clients with Office 2003 (sp3) the end users got new PC’s with Windows 7 Prof SP1 and Office 2010 SP2. using these systems some users got back to me complaining they got the error “. cannot be accessed. The file may be corrupted, located on a server that is not responding, or read-only”  this occurred when opening (old) .xls files (but i have also seen it with old .ppt and .doc files) on the network.
    I should tell you the error we got was in Dutch, here it reads: “Kan geen toegang krijgen tot . Het bestand is mogelijk beschadigd of staat op een server die niet reageert. Het kan ook zijn dat het bestandeen alleen-lezenbestand is.

    Solution:

    So as mentioned the information box appears when Windows 7 wants to write this file to the offline files cache. the solution in domains is to disable Offline files on Windows 7 (default it is enabled in Windows 7, you explicitly have to turn Offline files feature off!). the solution is shown here and here.

    Analysis

    The thing sticking out here is: the file in the error is designated as “.”  this is an indication for a fault in name resolution. working on this error the primary analysis is: Opening a .xls file that resides on a network Excel opens the file in compatibility mode. We know this because the file is being opened in compatibility mode by excel and on display on the screen when the error is thrown. Hence the error is being caused by a process after opening the .xls file.
    Viewing the event log it warns me about Event ID: 300 Source: Microsoft Office 14 Alerts it tells me things like:

    Microsoft Excel
    Kan geen toegang krijgen tot . Het bestand is mogelijk beschadigd of staat op een server die niet reageert. Het kan ook zijn dat het bestand een alleen-lezenbestand is.
    P1: 100101
    P2: 14.0.7015.1000
    P3: xqgg
    P4:
    What do these P-codes mean?
    P1: application name that has occurred this error
    P2: application version
    P3: application time stamp
    P4: Assembly/Module name
    P5: Assembly/Module version
    P6: Assembly/Module timestamp
    P7: MethodDef
    P8: IL offset
    P9: exception name

    In this case the application 100101 probably is explorer, version is the Excel version, the timestamp is really puzzling me though, it could be the event viewer is having trouble converting the timestamp code… I did some google-ing and found these threads: http://code.google.com/p/win-sshfs/issues/detail?id=42 http://social.technet.microsoft.com/Forums/office/en-US/56b360c5-1f80-4d8b-b7bc-43e421b7d3f2/excel-causes-error-on-open-cannot-be-accessed-the-file-may-be-corrupted-located-on-a-server?forum=excel they are both suggesting problems with accessing data, only one of them thinks it is a local computer issue.

    Diving deeper

    After seeing these threads i got the impression it would be something to do with the access of the network. i checked everything on name resolution, that was ok, secondly i checked all settings in Excel, they are all the same as the Citrix (server 2008 R2) environment on which it all works, no questions asked. they are all the same.
    So next up: troubleshooting steps.
    After mapping the network drive directly to another drive letter i got it working without errors. what’s the difference? the mappings used in the problem are mapped from a DFS share! so not using the DFS mapping resolves the problem!! what’s the issue then? DFS maps network shares to a single ‘DFS tree’ mapping drives from this tree will result in windows calls to the DFS root, which, on its turn, will resolve the mapping to UNC named paths. So that’s probably the source of the erratic behaviour of Excel.
    Reconstructing the cause together with the information drawn here makes me think Excel in compatibility mode will open a .xls file do some redrawing of some sort to make it accessible to the new Excel Open office file format (or something) and then write this information back to the original file. this last step does not seem to be successful…

    Update: after further digging i came to the solution, it finally appeared to be an issue related with Offline files feature in Windows 7.

    Workarounds

    There are two general workarounds:
    1. Open the file, cancel the error and convert it to the new (.xlsx) format.
    2. Map a new drive letter to the share from which the file is coming from and open it.

    Some thoughts about this problem

    First of all, Microsoft should give us more information about the way Excel works in compatibility mode (only from purely cosmetically point of view it should be solved) secondly converting all files to the new file format will give us a whole lot extra files (and overhead) aside from the storage problems it will probably raise.
    See you next time!


    Thursday, September 19, 2013

    AD Computer scanner with PowerShell for Windows 2003 and up with Gridview

    As always; my days get all clogged with things i must do; for instance make an overview of all AD computer objects and sort out all obsolete items.

    This can be done in many ways i just opted for the PowerShell way and using the Gridview. this thing is so powerfull out-of-the-box that the script itself remains small.

    the output looks like this:

    ADComputerScanner1

    This grid will find: Name, Description, OperatingSystem, Servicepack,Lastlogontimestamp, Creation date, Logoncount and the time a bad password was put in.

    The Gridview itself has some powerful filtering options. With the add criteria; filters items can be added. you just have to experiment with the filters to see what they can do.

    This script does NOT use the ActiveDirectory PowerShell module. it just finds the AD domain root itself and connects to it with ADSI so this script can be run just about everywhere as long as it is a Windows Domain with PowerShell enabled on the scanning machine, this script, for example, is ideal to scan a Active Directory that is not Domain level 2008 or higher; it also runs good on older 2003 environments.

    Please beware; in large environments this script can pull quite some LDAP traffic from a domain controller; it is not BITS enabled and does not use Qos

    have fun with it

    #####################################################
    # Name: ADComputers Scanner
    # Date: 19-9-2013
    # Version: 1.0
    # Creator: Bas Huygen
    # Changetones:
    #####################################################

    #get ADSI information from root domain
    $dc=[ADSI]""
    $domain=$dc.distinguishedName
    $domainexw="LDAP://"+$domain
    $ADDomain=[ADSI]$domainexw
    $ADSearch= New-Object System.DirectoryServices.DirectorySearcher
    $ADSearch.SearchRoot=$ADDomain
    $ADSearch.Filter= "(objectCategory=computer)"
    $ADSearch.PropertiesToLoad.AddRange() 2>&1

    #get all computers from the root domain
    $results=$ADSearch.FindAll()

    $array.Clear()

    #Loop through all computers of the domain and gather information
    foreach($res in $results){
    $obj = New-Object PSObject

    #$resdescr=$res.Properties.description
    $obj | Add-Member NoteProperty Name ([string]$res.properties.name)
    $obj | Add-Member NoteProperty Description ([string]$res.Properties.description)
    $obj | Add-Member NoteProperty operatingsystem ([string]$res.Properties.operatingsystem)
    $obj | Add-Member NoteProperty operatingsystemservicepack ([string]$res.Properties.operatingsystemservicepack)
    $rawtime= [string]$res.Properties.lastlogontimestamp
    $obj | Add-Member NoteProperty lastlogontimestamp([datetime]::FromFileTime($rawtime))
    $obj | Add-Member NoteProperty Created ([string]$res.properties.whencreated)
    #$pwlastraw=[string]$res.properties.pwdLastSet
    #$obj | Add-Member NoteProperty PasswordLastSet ([datetime]::FromFileTime($pwlastraw))
    $obj | Add-Member NoteProperty LogonCount ([string]$res.properties.logoncount)
    $badpwdraw=[string]$res.properties.badpasswordtime
    $obj | Add-Member NoteProperty badPasswordTime ([datetime]::FromFileTime($badpwdraw))


    #Write-Output $obj
    [array]$array += $obj
    }


    $Title = "Machine view of domain $domain"
    $array| sort Name|Out-GridView -Title $Title


    Friday, September 13, 2013

    WakeUp! a small GUI to wake Windows Machines from a PowerShell script

    Because i need it so much i took the script i published before on link and enhanced it with a little GUI. here is a screenshot:

    wakeup

    It works like the script; the input is the MAC address from the line after MAC Address above and the script converts the MAC address to a unicast Wake on LAN packet. Next it will sent it through all connected Network adaptors connected.

    On the Settings tab there are two lines: the DNS domain and the DHCP export file; used for retrieval of the cached MAC addresses.

    It works like this: just type the machine name on the Computer Name line and hit Wake Machine the script will try to fetch the MAC address from the DHCP export. another way to use this app is to input the MAC address (with or without computer name) and hit Wake Machine this will also work.

    wakeup2

    Information about the DHCP Export can be found here (again) .

    The two lines on the settings tab are reset to default every time the scripts starts. to change these lines to your own default, edit lines:  289 and 320 from the script.

    wakeup3wakeup4

    the script can be downloaded here: http://sdrv.ms/ZyH49Q

    please beware, it is not signed, smart screen will warn you about that.

    ‘Good morning to you machines”

    Wednesday, September 11, 2013

    How to Setup SQL Server for Config Manager 2012 SP1 (SCCM)

    Because i have had quite some trouble setting up a SQL Server for Config Manager 2012 on a separate server i decided i should write this down and share it to other people having similar problems:

    So for Config Manager 2012 the requirements for a database are the following (excerpt from http://technet.microsoft.com/en-us/library/jj628198.aspx)

    System Center 2012 SP1 component SQL Server 2008 R2 SP1 Standard, Datacenter SQL Server 2008 R2 SP2 Standard, Datacenter SQL Server 2012 Enterprise, Standard (64-bit) SQL Server 2012 SP1 Enterprise, Standard (64-bit)

    App Controller Server

    Data Protection Manager (DPM) Database Server

    Operations Manager Data Warehouse

    Operations Manager Operational Database

    Operations Manager Reporting Server

    Orchestrator Management Server

    Service Manager Database or Data Warehouse Database

    Virtual Machine Manager (VMM) Database Server


    SQL server installation

    To install an SQL server just follow the standard installation for a server and DO NOT SELECT EXPRESS version; SCCM Central site does not support EXPRESS versions of SQL server.

    During installation of SQL the only thing to remember is: select a domain account for the SQL Server service:

    sqlserver3

    I am a typical IT admin so i am lazy when it comes to configuration in a test lab, so i used the domain administrator account for this test version; please do not do this in a production environment; be a good boy/girl and create a service account for this!

    After the installation of SQL server has finished you have to configure the server for  three things:

    • Firewall
    • SQL configuration
    • Local administrators of the SQL server

    The first one is quite simple: fire up the Firewall application and add a port rule for TCP 1433 and TCP 4022 to allow minimally the Domain profile.

    sqlserver4

    SQL installation itself does also add the SQLServer x64 to the firewall, this can stay because it does not do any harm.

    Next the SQL configuration: this one did cost me most of my time because i did not notice the message:

    The instance name that you use for the site database must be configured with a static TCP port. Dynamic ports are not supported

    sqlserver1

    This is really important: so i repeat : DO NOT USE DYNAMIC TCP PORTS ON SQL SERVER FOR THE SITE DATABASE OF SCCM 2012

    The configuration of the sql service look like this:

    sqlserver2sqlserver5sqlserver6

    remember: the TCP Dynamic ports must be blank on all IP’s you use. also the TCP ports all must have 1433 when you use this (default) SQL server port for SQL transactions.

    The last configuration is the addition of the SCCM server computer account to the local administrators group of the SQL server because i you don’t you receive an error like this in the prerequisites check of SCCM 2012 SP1

    sqlserver7

    to enable this do the following:

    Open the local user and groups MMC on the SQL server and open the group administrators: add the COMPUTER account of the SQL server to this group, like this:

    sqlserver8

    after this, the prerequisites check should be fine and the SQL portion of the installation is complete.

    See you next time!

    Monday, September 09, 2013

    Handy Computer scanner

    When you do individual computer migrations it is desirable to get some computer- software- logged on user- and patch information on beforehand about the to-be-migrated computer.
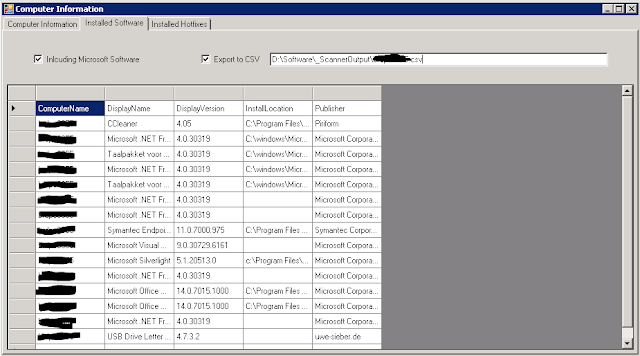
    For this i have bundled a few scripts i created and used before and wrapped them into one GUI to scan a machine and get the information presented in a GUI.
    Here are some screenshots:
    computerscannertab1


    computerscannertab3
    The scanner works real easy: just input the computer name and hit Get Computer Information. or just hit <Enter>

    This version exports a csv to a path specified behind the Export to CSV checkbox. by default the checkbox is checked.
    to change this behaviour goto line 1143 and edit the line to:
    $cbExport.Checked = $False

    To change the location to which the CSV file is written, edit the line: 1137
    $tbCSVExport.Text = "D:\Software\_ScannerOutput\%Computername%.csv"

    For the scanner to work the target computer must be WMI- and remote registry enabled. Links: http://kb.gfi.com/articles/Skynet_Article/how-to-enable-remote-registry-through-group-policy
    http://kb.gfi.com/articles/Skynet_Article/how-to-enable-remote-registry-through-group-policy

    The script can be downloaded here: http://sdrv.ms/166HegJ

    Friday, September 06, 2013

    PowerShell Array’s inside-out

     
    Learning PowerShell is one thing, but learning arrays in PowerShell is another. Since i started using PowerShell as my primary programming- and scripting language i have stumbled on this array stone many times.

    Now it is time to really get to the bottom of this.

    What’s an array

    Arrays are, bluntly put, programming variables with more functionality and more space in this view an array can be used as a variable in your PowerShell code. as a matter of fact most beginners do experience arrays as a variable certainly in the beginning. that is because arrays do tend to work exactly like  a variable when it only has one item and one value. look at this example:
    [string]$Variable="one value"
    [array]$array= @("one value")
    
    $Variable
    "---------"
    $array

    This code will display exactly the same return codes when run.

    one value
    ---------
    one value

    now look at this:
    [string]$Variable="one value","one value","one value"
    [array]$array= @("one value","one value","one value")
    
    $Variable
    "---------"
    $array
    this will output:
    one value one value one value
    ---------
    one value
    one value
    one value

    Here you will see the first differences between a variable and an array. The variable will handle the value as one string while the array will display 3 strings in an row.

    PowerShell will use default values for options you do not present. In this case PowerShell will present the entire $variable as a string because you defined the variable as a string so the output will also be a string. with the array we defined a one dimensional array. because of that the output of the array to the default output (screen) will the the presentation of 3 objects, each presented on its own row. you can see the differences even more when you request PowerShell to return a specific item of a variable or array:
    [string]$Variable="one value","one value","one value"
    [array]$array= @("one value","one value","one value")
    
    
    PS C:\Windows\system32> $Variable[0]
    o
    
    PS C:\Windows\system32> $array[0]
    one value

    As can be seen from this example the first item of the variable is the first character of the string while the first item of the array is the first object.

    Array dimensions


    Arrays come in two flavours: one-dimensional and multi-dimensional. the one-dimensional is shown above so lets look at multi-dimensional arrays:

    a multi-dimensional array is defined like this:
    $MultiArray = @(("one","two"),
                 ("three","four","six"))


    To retrieve the entire array a simple $MultiArray will suffice but retrieving a specific item from an array like this is done a bit different.

    Say you would like to retrieve the second item from the second row, how do you do that?
    $MultiArray[1][1]
    four

    So the trick is to define the item you want to retrieve and define it in square brackets [ ] one for the row to select (the number in the first bracket) and one number for the column (the number in the second bracket) the count of rows and columns is from 0, so row 1 is [0]

    Handy tricks in multi-dimensional arrays


    There are some nice ‘tricks’ with multi-dimensional arras:


    • retrieve the last item of a row:
    $MultiArray = @(("one","two"),
                 ("three","four","six"))
    
    $MultiArray[1][-1]
    six

    So you give a –1 for the last item to be retrieved. so how to retrieve the second last item of row 1?
    $MultiArray = @(("one","two"),
                 ("three","four","six"))
    
    $MultiArray[0][-1-1]
    one


    • retrieve items 2 to 4 from row 2 from an array
    $MultiArray = @(("one","two"),
                 ("three","four","six","seven","eight","nine"))
    
    $MultiArray[1][2..4]
    six
    seven
    eight

    To really get this down have some fun with it like building a loop to get things done:
    $MultiArray = @(("one","two"),
                 ("three","four","six","seven","eight","nine"),
                 ("ten","eleven")
    )
    
    $noRows=$MultiArray.Count
    
    for($i=0;$i - $noRows;$i++){$rownow=$null
        [string]$rownow += $MultiArray[$i]
        [array]$gridarray += $rownow}
    $gridarray
    
    one two
    three four six seven eight nine
    ten eleven

    That is about it, you should really have a go and do some things with arrays to get to know them well.

    See you next time.

    Tags van Technorati: ,,